This post may contain affiliate links. For more information please read the disclosure.
If you’re eager to learn new skills to boost your income,
Then starting a blog is your way to prosperity. In this post, I’ll walk you through how to start a blog and turn your hobbies into a profitable business.
We are living in a golden age of the internet and social media, where we can share our ideas and experiences with a wider audience.
This is the greatest opportunity to make money online with blogging in 2025.
Think of it this way, it’s nothing new; you have already been on Facebook and Instagram for years, you’ve shared your pictures, thoughts, and opinions.
Blogging is just an extension of your online presence, where you share your creative ideas with the world.

Table of Contents
Why you should start a blog?
There is so much buzz about blogging. Is it worth it?
To be honest, we all are good at something. I’m good at personal finance and saving money, you might be good at cooking and baking, or know more about the latest outfits and nails. Just share it with the world.
Money might be the driving force behind creating a blog. But money is not everything; the value you can add to the lives of people through your blog is immeasurable.
You never know, the meaningful information you share can really help someone solve their problems.
Blogging is a platform where you can touch so many lives; it creates a big impact. And money is just the byproduct of this value addition.
Just pick your area of interest and start sharing your knowledge. And when you inspire people or share something useful, they’ll respond.
By sharing this information on social media, your blog will start ranking on Google. As a result, you’ll see your website traffic begin exploding.
This is when things come full circle when you start to monetize your blog to make some serious money online with ads and commissions.
Who knows, one day your blog might replace your full-time job. You’ll never know until you try it out yourself.
The Biggest Hurdle in Starting a Blog
The biggest road block in starting a blog is your mindset. You often doubt yourself: “I’m not a good writer, who will read my blog post? Already there are millions of blogs out there, where I stand in the crowd?”
These are all negative thoughts that stop your progress. Never fall into this trap. Don’t look for perfection. Getting started is the key if you’re a beginner.
To overcome this hurdle, take the bold step to start a blog and write your first blog post — and hit the publish button. When it comes to blogging, everyone has a unique way of presenting things.
Technical Challenges in The Process
The next challenge in starting a blog is a bit technical: the set-up process. Every beginner blogger thinks, “I’m not a techie, how do I set up?”
But believe me, it’s very simple: we are in 2024, Right? We got video tutorial for pretty much anything.
Don’t worry! I’ll walk you through the entire process step-by-step. Stay tuned!
How to Start a Blog
To start a blog, you don’t need to be a nerd. For a beginner blogger, basic computer skills are enough to set up a blog. In the past, designing a website, writing, and adding images required a lot of coding.
But now, we have very user-friendly platforms like WordPress. It is a great tool to publish blogs without worrying about coding.
When it comes to starting a business, its initial starting cost is very important. You don’t want to commit a large amount at the beginning.
Coming from a finance background, I can definitely tell you, starting a blog is the most cost-effective way to kick-start an online business because it’s reasonably low compared to any other business.
Even if you have a full time job and looking for a easy side hustle to start from home, creating a blog is a good idea because you can work from comfort of your home and at any time.
Steps in Starting a Blog
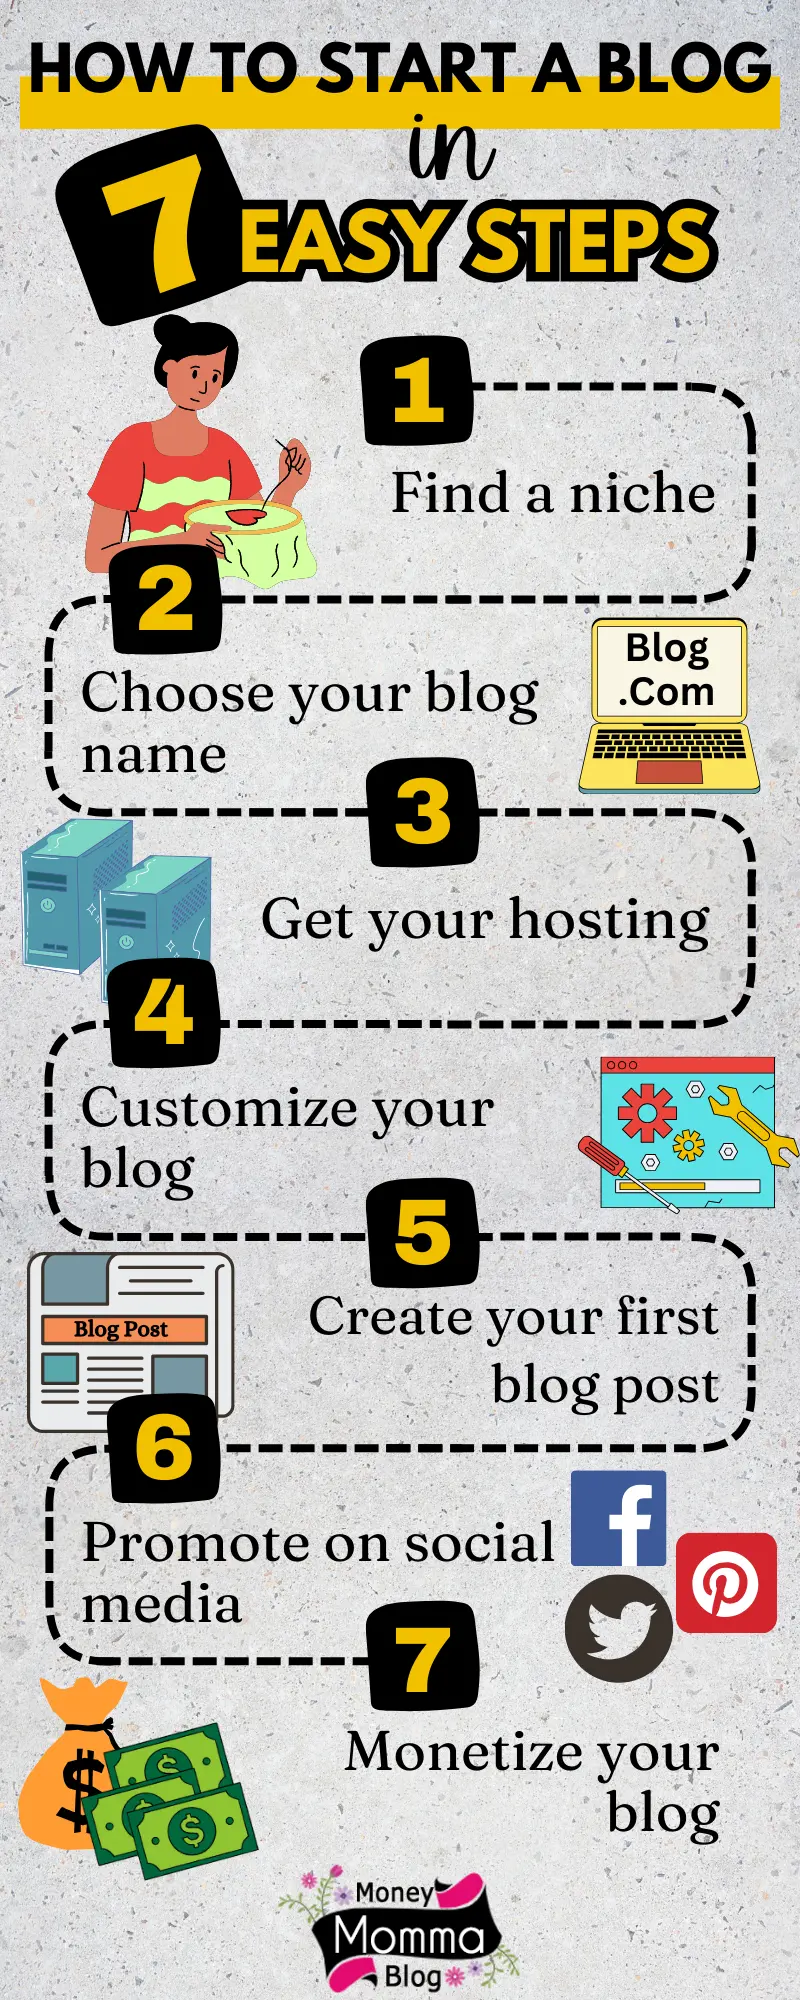
So if you’ve been searching for how to become a blogger, the answer lies in these 7 simple steps. These steps are further explained in full detail below.
- Find a niche for your blog
- Choose a name for your blog
- Get the hosting for your blog
- Designing and customizing your blog
- Publishing your first blog post
- Promote your blog on social media
- Monetizing your blog – Make money blogging
Finding a niche for your blog
Who doesn’t want to create a successful blog that makes money? But first, you have to identify a hobby or interest that you truly enjoy and are passionate about.
Ask yourself a question — What do I love doing in my leisure time? Do you have any special skills that you want to share with the world?
To give a few generic examples. It can be gardening, making simple crafts, yoga, cooking, traveling, parenting and many more ideas.
Sure, hobbies can be anything, like – collecting insects, ghost hunting, parkour, cosplay etc. But you must be very careful while choosing a blogging niche because these are not profitable ideas to blog about.
There must be a sizable audience that is interested in your topic. Let us say, you’re passionate about a certain foreign language that very few people know. It would be hard to get website traffic for such ideas.
Plus, I’d also like to mention some niches like gambling, adult content, and arms and weapons that are a BIG NO.
I’m sure you must have some cool hobbies and interests that fall under the popular categories like. Don’t worry too much and go with it!
Here is a list of most popular and profitable niches you can choose from:
- Health and fitness
- Food and recipes
- Travel
- Personal finance
- Beauty and fashion
- Home decor
- Pets
- DIY Crafts
- Make money online
- Blogging
- Tech
- Parenting
- Lifestyle
Of course these are some of the broad niches, within these niches you can dive deep to find your interest
Choose a name for your blog
Once you have figured out your blogging niche, next you need to choose a name for your blog or a domain name. A domain name is the web address of your blog – www.yourblog.com
It is completely up to you what you want to name your blog or website. But if you follow these practices, it will make your blog look more professional and appealing to your audience. And can help you to build a recognizable brand one day.
1. Name that reflects your niche:
Try to come up with a name that resonates with the niche you have selected. Let’s say you started a food recipe blog, then your blog name should have words related to food.
Include words like kitchen, food, taste, recipes, cook and so on. Similarly, if you’re blogging about gardening, beauty, fashion or travel, select words related to those topics.
Another added advantage of using niche specific words is that it helps in SEO and makes it easy to rank your keywords and blog posts on Google.
2. Precautions while selecting a blog name:
Try to keep your blog name short and easy to recall. I know it’s a bit hard because most of your favorite names have already been taken. Still, you can brainstorm to come up with some creative names and avoid these mistakes.
Don’t go for long name like: brendashealthykitchen.com because of a very practical reason. In the search engine (Google) when they show website results, it only shows the first few characters of the blog name, and the rest are cut off.
A long blog name makes the URL too long to fit in the search results. Secondly, it’s hard to remember for an audience. If you’re planning to create a brand, then the blog name should be short and precise.
A 12-15 character name is good enough for starters.
First, check whether the domain name you have finalized is available or if it has already been taken. In that case, try again with some more creative names that are available to register.
3. Make it look professional:
Try to avoid numbers and ‘-’ (hyphens) in the blog name; it does not look professional. Numbers and hyphens break the flow of words and look unusual and spammy.
Always go for a .com domain because it looks more professional compared to .net, or .blog. Most audiences find .com websites as trustworthy and authentic.
4. Brainstorm unique name:
Come up with something that is unique. Don’t try to sound like someone who already exists on the web.
5. Check the spelling and pronunciation:
Before you register a domain name, double-check the spelling and pronunciation to avoid any disaster later because it is irreversible.
Get the hosting for your blog
I often get a common query, from beginner bloggers – how to start a blog for free? Or how to start a blog with no money?
The answer is yes, there are plenty of platforms like: Blogger.com, Wix, WordPress, Weebly and so on that offers anyone to start a blog for free.
But there are some serious drawbacks to a free blog. Sure, you’ll definitely not have to pay anything, but you must remember, nothing comes free in this world.
In case of a free blog, you’re not the owner of your blog, nor do you have any control over your content. The hosting platform owns and controls it.
Anytime, they can close your blog or remove any of your blog post.
Also, the free blog platforms are unreliable because of their slow loading speed, security risk, limited storage, and support.
Ultimately, you want to make money from blogging. But all the major affiliate networks and ad networks do not work with free blogs, as they don’t meet their standards.
And, If there is no money, what’s the point of going for a free blog?
Why you need a self-hosted blog?
All the issues that we discussed above are addressed in a self-hosted blog. You can think of a self-hosted blog as your own small storage space on the internet, where your blog is stored on a server. Anyone around the world can access your site via the internet.
Benefits of hosting your own website:
1. You get excellent speed and uptime because Google loves fast loading websites. If your website is taking more than 3 seconds to load, people will skip your blog and leave.
2. You can create your own professional domain name or brand. For instance, if you create a free blog on Blogger.com, your domain name will look like – yourblog.blogspot.com same with a free WordPress.com – yourblog.wordpress.com This doesn’t look professional and trustworthy.
On the other hand, if you use a self-hosted blog, it will look like – yourblog.com now, that is a professional looking website which one can trust. And once your blog takes off, you can establish it as a brand.
3. To achieve success in blogging you need sizable traffic from Google, this is where the free blogs fail. With the limited SEO options, and unprofessional look, it becomes a challenge to get quality links and build authority in the eyes of Google.
On the other hand, a self-hosted blog makes it easy to add SEO plugins, and other features.
That makes your site look professional and trustworthy for other sites to add links and build authority. This is when Google starts trusting you and sending traffic to your blog.
4. With a self-hosted blog, you have full control over your blog, how it looks, design, and customization. It allows you to install your favorite themes, widgets, and plugins.
5. If you face any technical problem with your blog, the hosting company support team is always there to help. But in free blogging platforms, you have to fix it yourself or post an issue in their community to get an answer.
6. There are many security features and backup systems available in a paid hosting plan to protect your site from hacking.
7. There is ample storage space for your blog that you can extend based on your need.
8. A self-hosted blog opens many doors to monetize your blog. With a professional and trustworthy website, you can easily get accepted to various affiliate networks and ad networks to make money online.
How to start a self-hosted blog?
So, now you understand why you require a self-hosted blog. You must be wondering how to set up a self-hosted blog?
It might seem very technical and overwhelming. Right?
No, it’s not that tough! Trust me, I was in the same place as you a few years back. And no, I’m not even a computer science major. If I, as a business major can do it, I’m sure, you can too. Don’t worry, I’ll walk you through the entire process.
To start a blog, you basically need three things. A hosting, a domain name and a content management system (CMS).
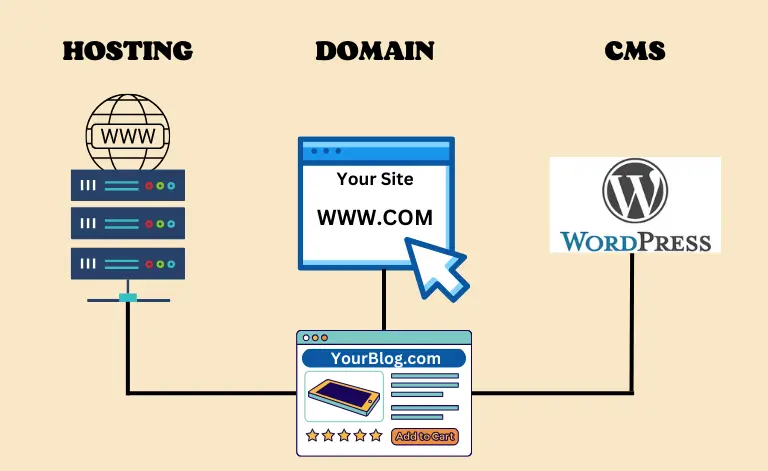
What is hosting? And why do you need it? Let me give you a very practical example. Think of hosting as a storage unit, where you store all your stuff. You pay rent to use the storage space.
The same goes for your website as well; all your blog’s text, images, and pages are stored on a web server owned by a hosting company. You pay a fee to use that storage space.
Hosting helps to connect your website with the users. If you don’t have hosting, how can someone sitting in Dallas access your blog?
What is a domain name? In the world of the internet, a domain name is a unique web address or URL of a website (facebook.com). Once you decide on your blog name, you need to register that web address with a domain registrar for a small fee.
Content Management System (CMS)
When you start a blog, you want to create blog posts or articles. To do that, you need a system that will help you organize images, edit texts and adding links. That exactly what a content management system does.
Across the web, there are many CMS platforms available, like Wix, Drupal, Squarespace, Joomla, Shopify and many more. Among them, the most widely used CMS is WordPress.
You would be amazed to know, 43.1% of all the websites use WordPress as their CMS.
What makes WordPress the most popular CMS is its user-friendliness. You don’t need to be a developer to work on WordPress.
Any non-technical person can easily build a website and customize it with the vast collection of plugins and themes within the WordPress ecosystem.
You can create a new blog post, write a title or sub heading, paragraphs, and add images and links without worrying about coding.
The best part, it’s free! WordPress is an open source CMS.
An important clarification, when you Google WordPress, you get two websites – wordpress.com and wordpress.org
WordPress.com is the free website platform just like blogger.com and wordpress.org is the website that provides the software, CMS system for your blog.
But you don’t need to worry about it because when you log in to your hosting dashboard, there is an option to install WordPress for your site.
If all of this sounds a bit technical, don’t worry! I’ll hold your hand throughout the entire process of setting up a blog.
Without any further delay, let’s start building a blog!
Like in every sphere of life, if you want to progress in blogging, you have to create a strong base. What that means is to invest in good hosting service.
How much does hosting cost?
Your hosting costs depends upon your requirement, how much storage space you need, speed and processor required, and so on.
Basically there are four types of hosting plans – shared hosting, cloud hosting, virtual private server (VPS) and dedicated server. A shared hosting is sufficient for a beginner but as your website grow you need more resources for that you need advance hosting plans.
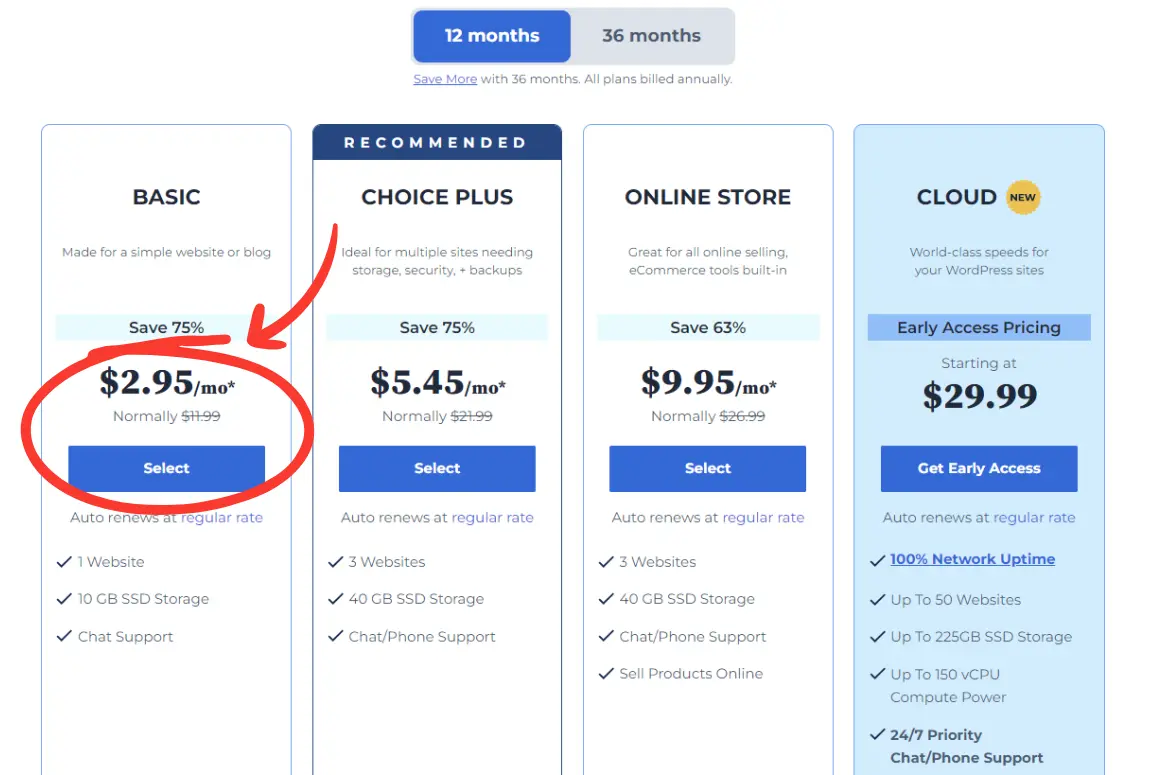
A shared hosting can cost anywhere from $3 to $50/month based on your requirements. But with BLUEHOST basic plan you can start your own blog with just $2.95/month plus, you’ll also get a FREE domain for a year!
Why to choose Bluehost?
Assuming you’re a beginner, you must be looking for a budget hosting plan without compromising on speed. In that case, Bluehost is a perfect choice for you because they offer most affordable plans with fast loading speed, security, and great support.
The best part is, once your website traffic starts to take off, and you need more resources, at that time you can easily upgrade to their advanced hosting plans.
What makes Bluehost stand out:
- Easy WordPress set up and onboarding
- Affordable pricing
- 10 GB SSD storage space
- Unmetered bandwidth
- For 1 website
- Free domain name for 1 year
- Free SSL certificate for your site
- Better loading speed, 99.9% uptime
- 24/7 chat support
- Free CDN
- 30-day money-back guarantee
Step-by-Step Guide to Set Up a Blog
In this easy tutorial, I’ll show you the step-by-step process of creating a blog on WordPress with Bluehost.
First, you require a Bluehost hosting plan. Get your Bluehost plan with this link. When you click on the link, you’ll land on a Bluehost’s home page. Click on the get started button as shown below.
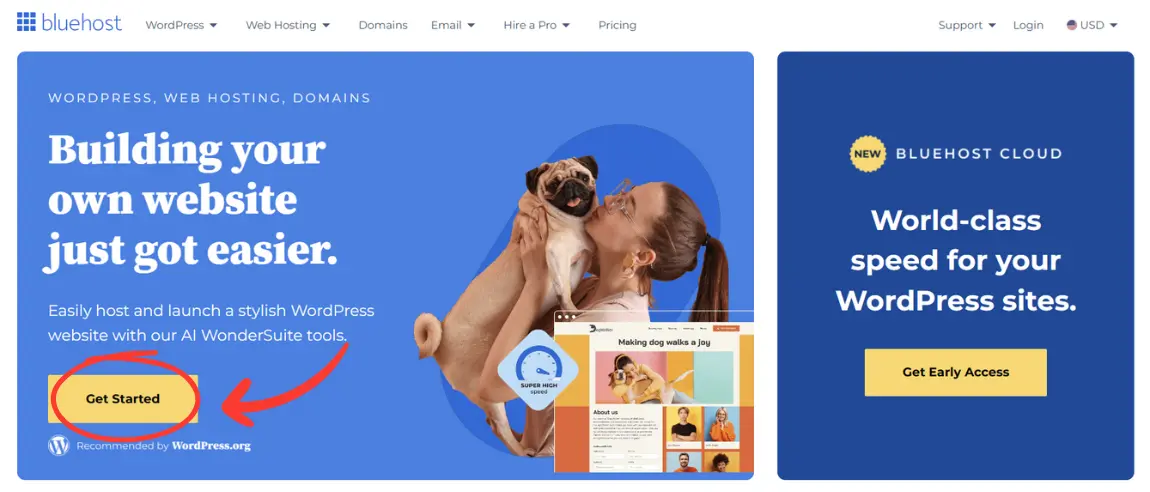
STEP: 1 Select your hosting plan
This will open a page displaying four hosting plans. Select the basic plan (first one)
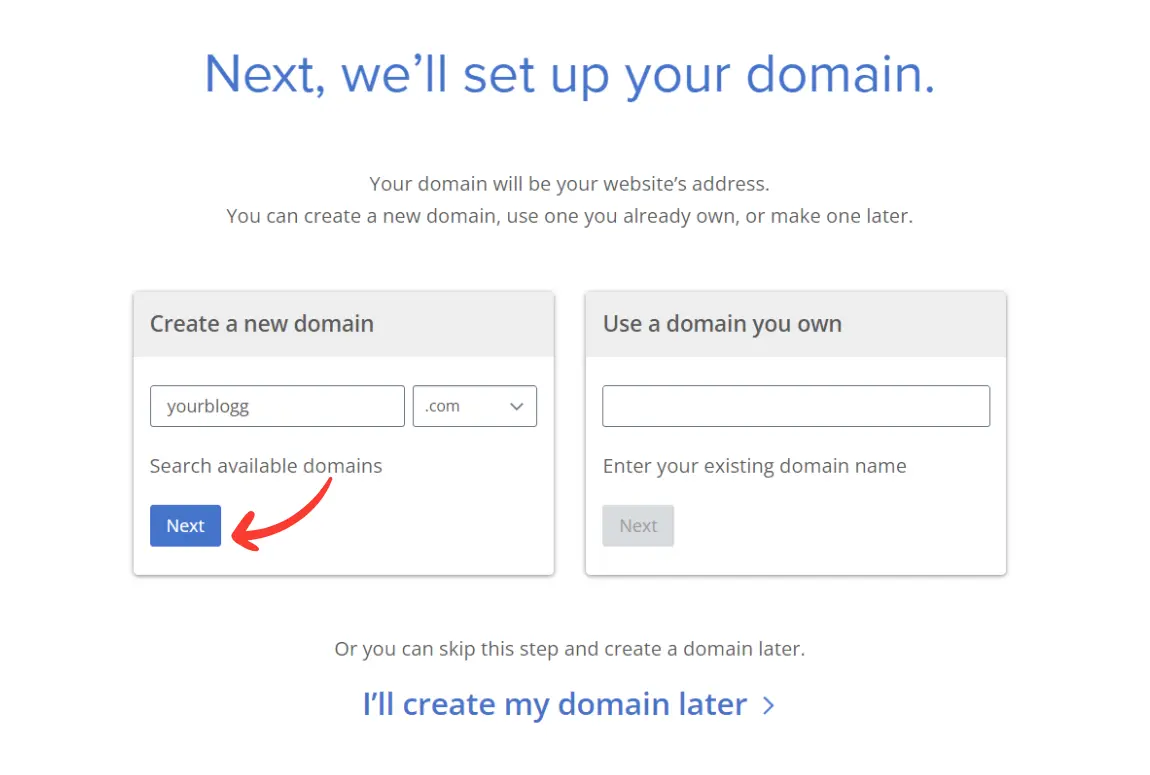
STEP 2: Set up your domain name
Type your desired domain name for your blog under create a new domain box. Set at .com. Press next to check whether the desired name is available. Else choose different domain name.
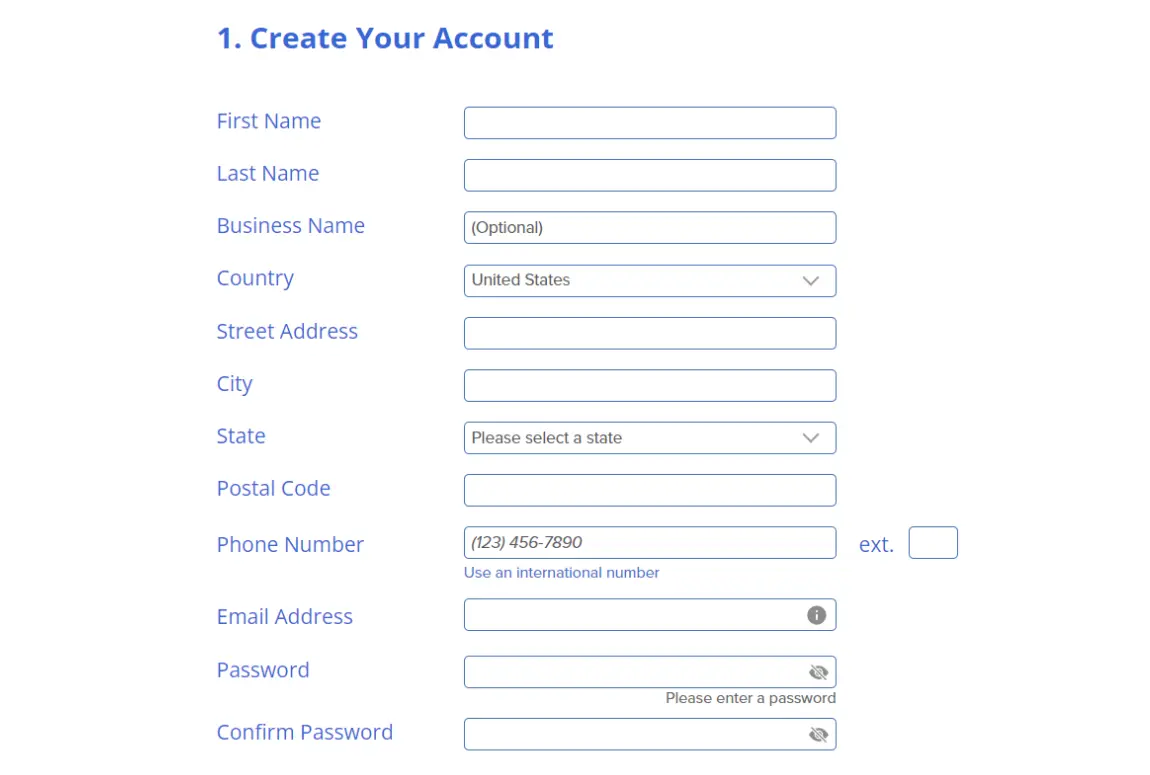
STEP 3: Create your account
Once you find your desired domain available, it will display the message, congrats, your domain is available and added to cart. Next you have to create your hosting account by filling the necessary information like name, address, phone number and email address.
Pay close attention to your email address and password, note it down safely because it will be needed at the time of log in to your Bluehost account.
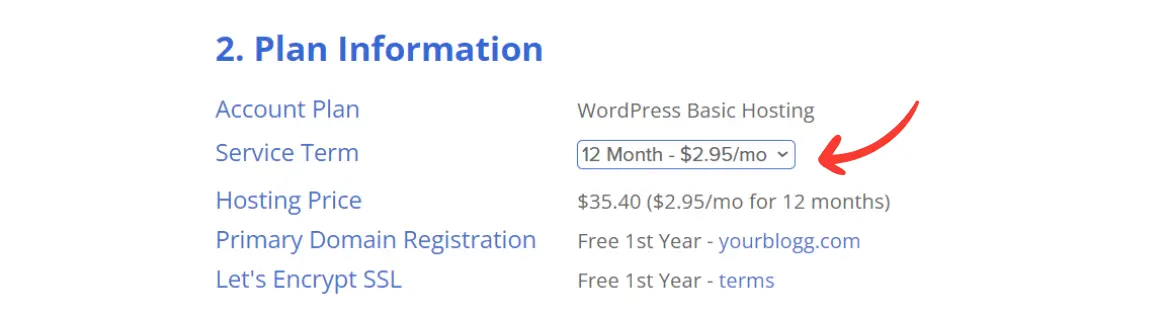
STEP 4: Check your plan information
This will show your hosting plan name and the period of service with pricing. For a beginner blogger, 12-month plan $2.95/month is enough to start a blog.
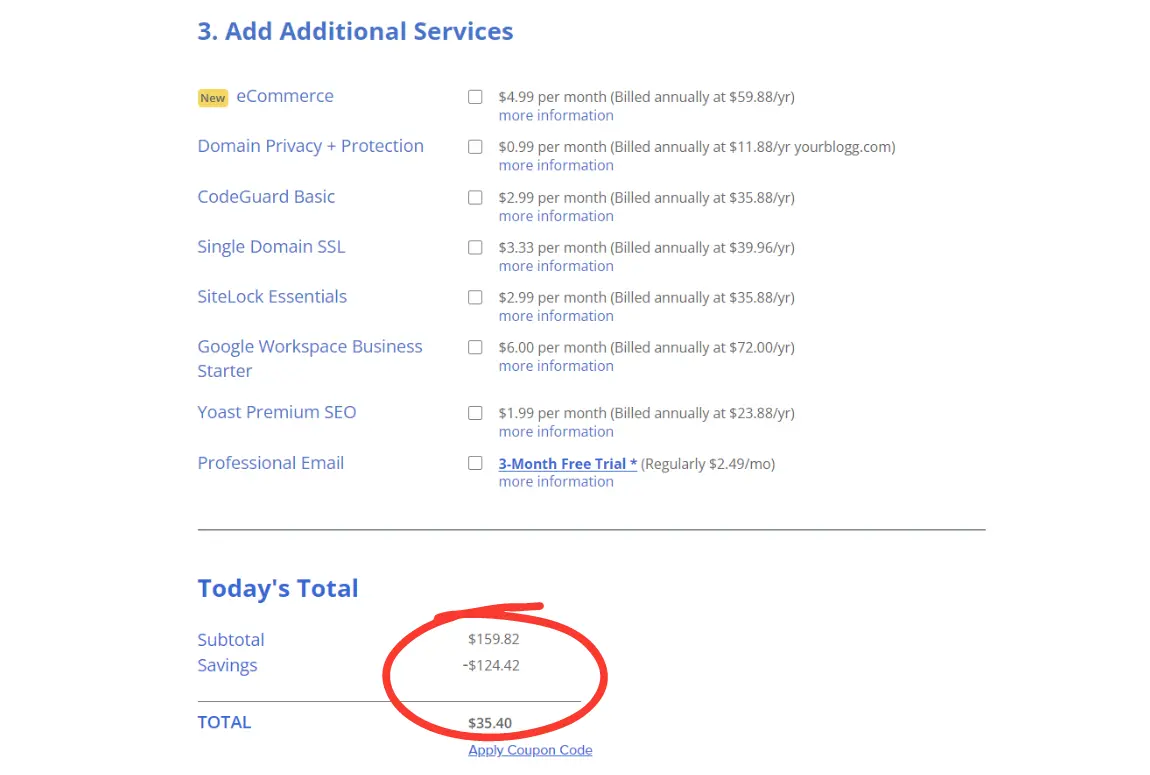
Add additional service:
Uncheck all the boxes in these sections. If you want to include any of these services you can check that box for that you’ll be charged extra.
At the bottom, you’ll see the total amount of your hosting plan.
Payment information:
Finish your purchase by entering the payment details, read their terms, conditions, and press submit.
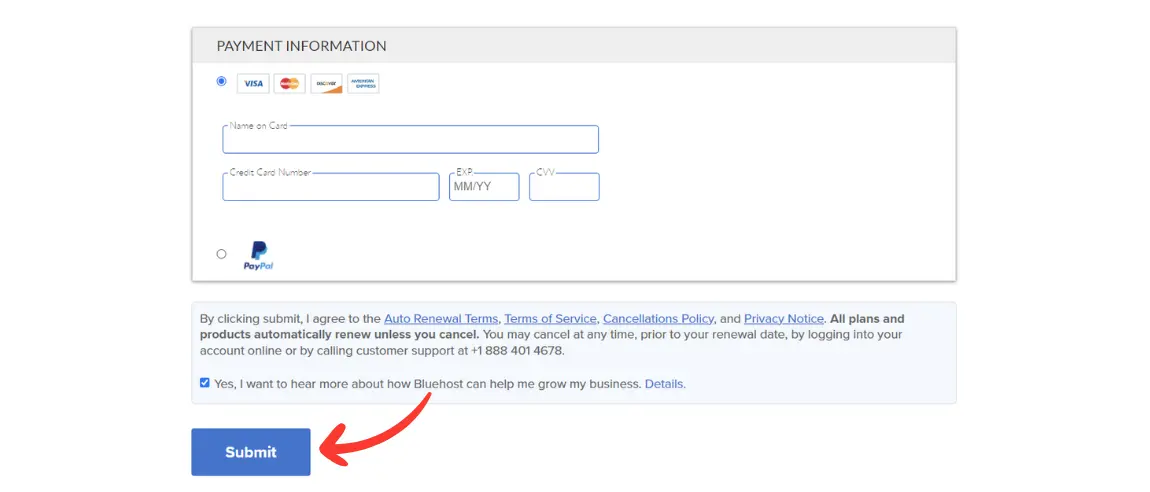
Bluehost will send a confirmation email to you. Check your email inbox and confirm your Bluehost account.
After finishing purchase, log in to your Bluehost dashboard. Select websites option from the left menu. Here you will see your site’s name, Just click over edit site button.
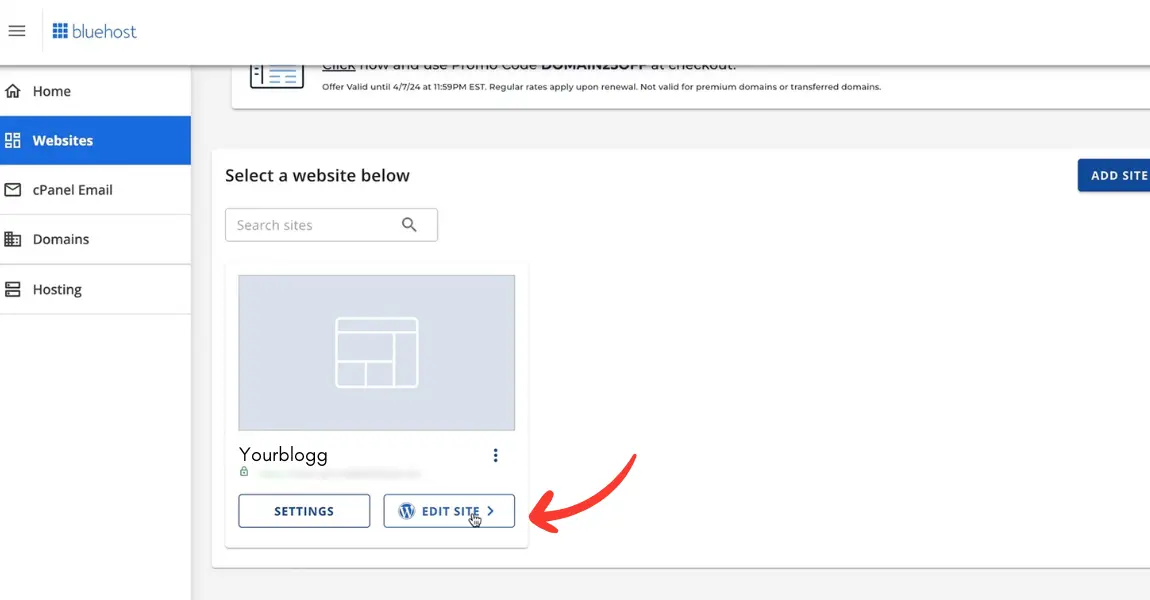
In the top right corner you will see a Log into WordPress button, simply press it, this will take you to Bluehost onboarding area.
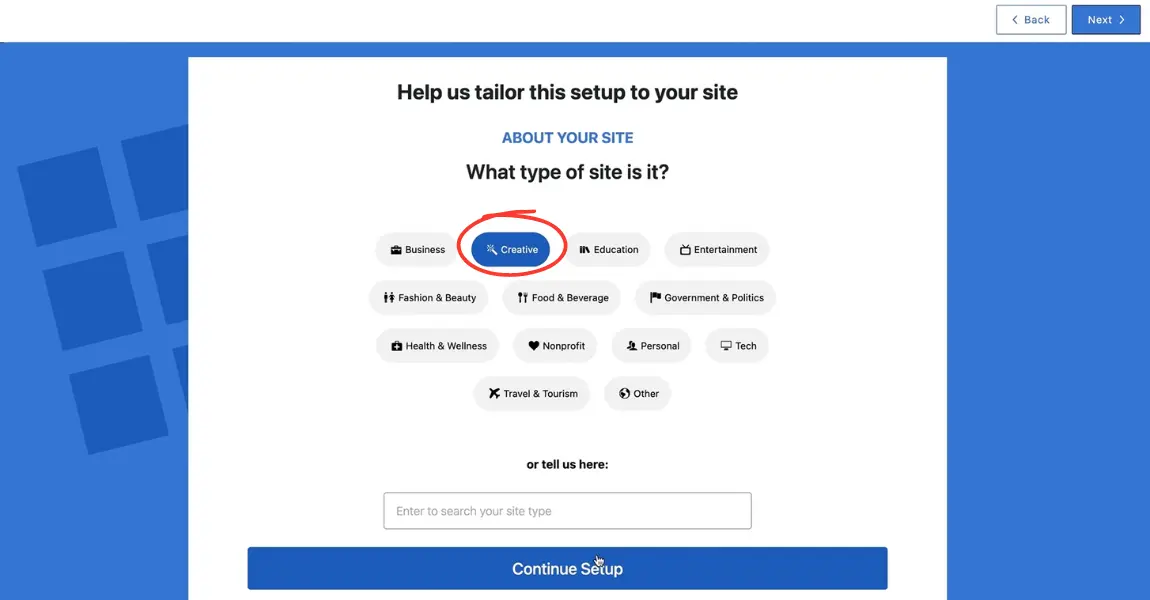
This interface will ask you a few easy questions about your blog and its type. This allows Bluehost to understand and customize your website to its type.
What is your experience with WordPress? If you’re new to WordPress, select never used it. Press continue to set up.

What type of site is it? Select based on your site’s category. Press continue to set up.
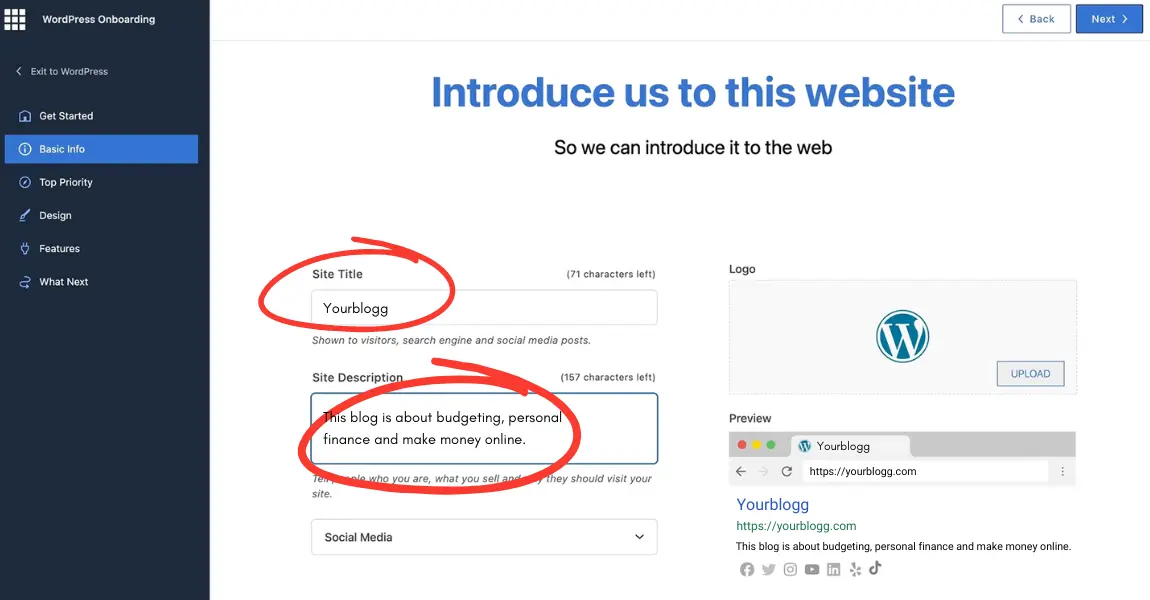
Introduce us to this website. In site title, enter your site name. In the site description, write what your blog is about. And upload your site’s logo. Then press the next button in the top right corner of your screen.
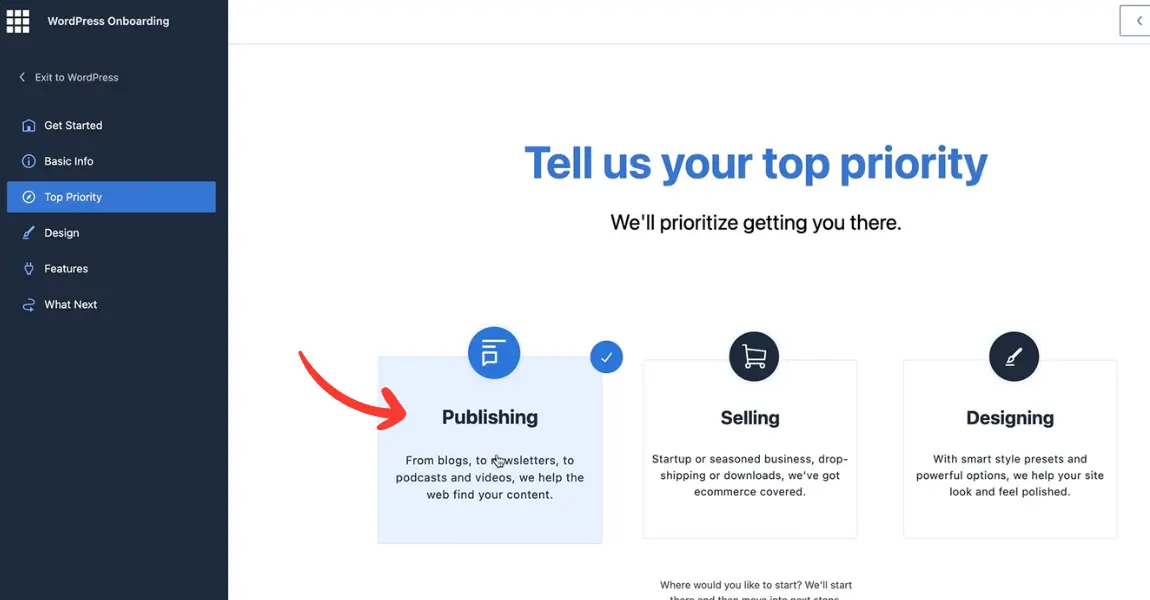
Tell us your top priority. Select publishing and press next.
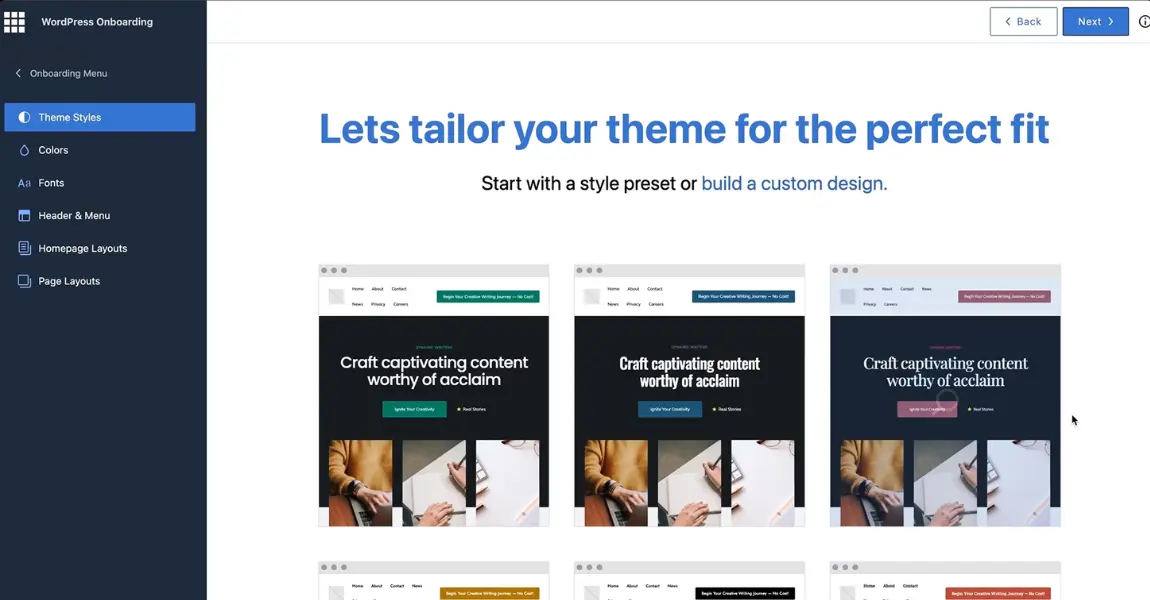
Let’s tailor your theme for the perfect fit – Select theme style of your choice and press next.
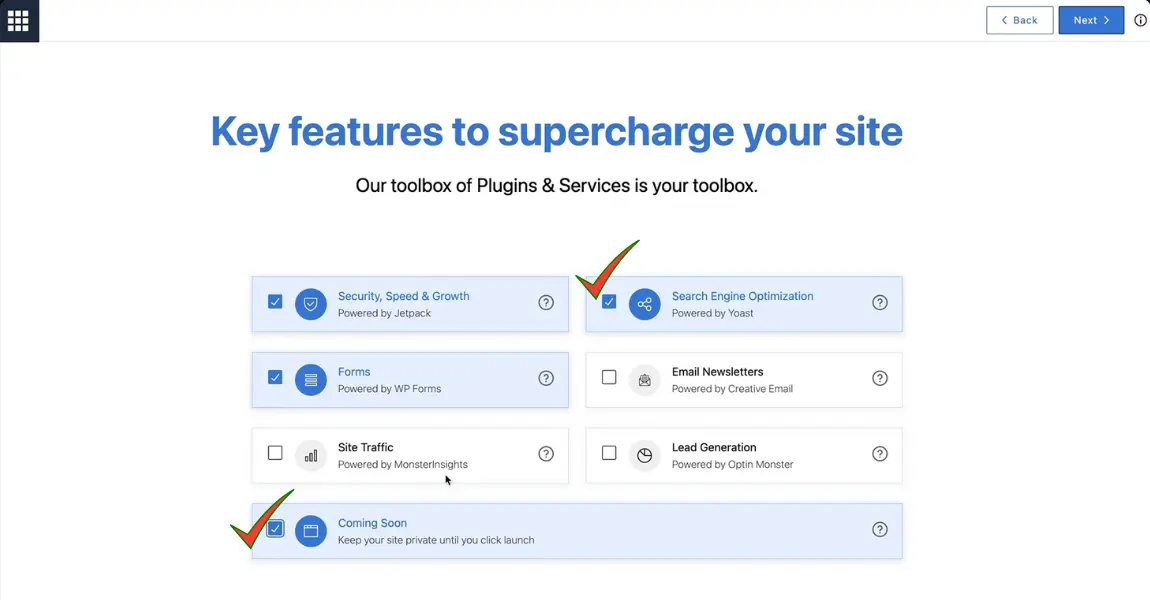
Key features to supercharge your site. Here you’ll see a bunch of plugins Bluehost provides. Select search engine optimization by Yoast and coming soon. Press next.
Press complete set up. All done!
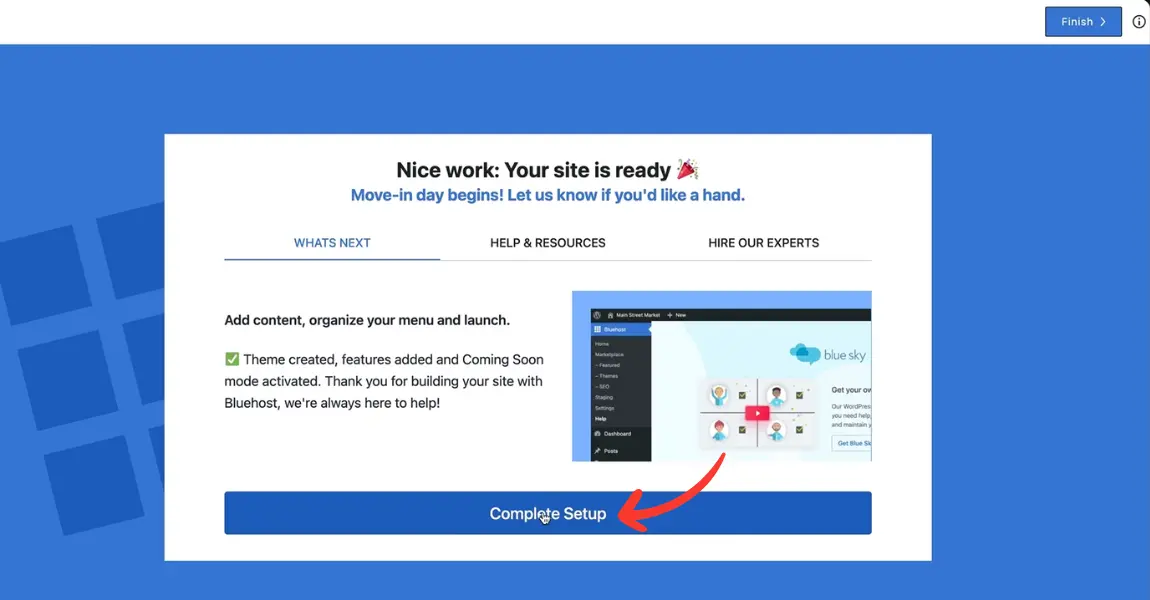
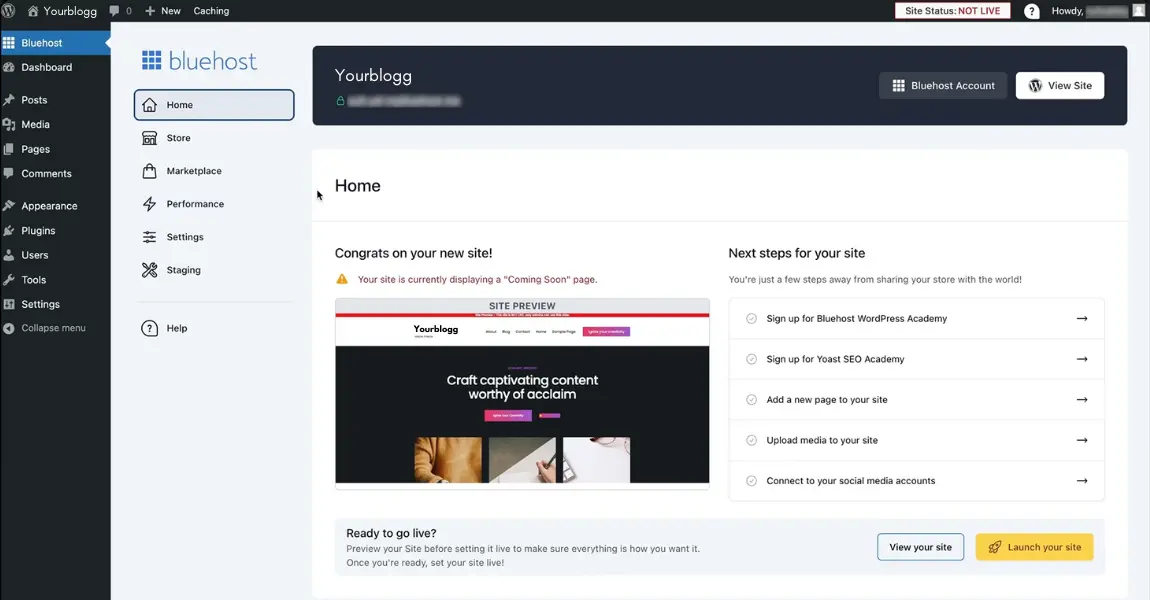
Once everything is set, your blog is ready. This is how your WordPress dashboard looks: This is a Bluehost plugin page. You can explore the menu and features to further optimize your site.
NOTE: When you purchase/register a new domain name and activate it, this will take anywhere from 24 – 48 hours to propogate. This is the time it takes to update your website’s DNS records accross the globe. So don’t panic if your blog is not working. Wait till the propogation completes. You can check your website’s DNS propogation here.
WordPress Dashboard For Beginners
If you’re new to WordPress or want to learn how to work in the WordPress dashboard, here’s a basic overview of how things works in the dashboard.
Once you log in to your WordPress dashboard, it looks like this:
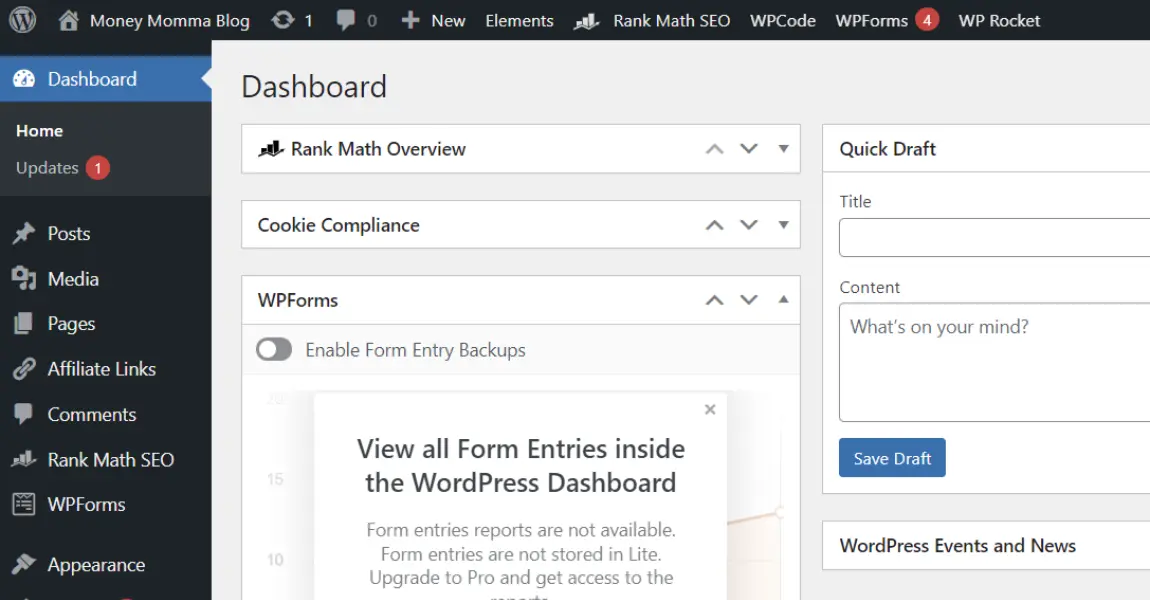
This is the back end of your blog/website where you can create a new post/page, add text, links, images, or edit anything you like.
In the top left corner of your screen, you’ll see a home icon with your blog name. If you hover your cursor over it, at the bottom, a link appears: visit site. When you open it in a new tab, you can see the front end of your site. This is how it looks to the visitors of your website.
To create a new blog post, click on post. You’ll see a add new post button on the top, press it. A blank space will appear, On top you will see add title where you type main heading of your blog post. Below that you see type where you can type the the paragraphs to form body of your blog post.
You’ll also see a + sign this is for add block. When you click this + sign, you will see a list of fuctions that you can add to your blog post. You can add images, links, tables, bullet points, headings and many other features.
In the same way you can create pages in WordPress by click on pages from the dashboard menu.
Designing and customizing your WordPress blog:
Once you got familiar with WordPress dashboard, you need to do some basic tweaks to customize your WordPress site.
1. Permalink Settings
Permalink is the way your blog post address looks like. When you start a new WordPress blog, by default, all your new blog post URLs include dates or some codes, which don’t look professional and are not SEO friendly. So you need to set them properly before writing your first blog post.
In your WordPress dashboard, go to Settings, then go to Permalinks. Here you’ll find the common settings, select the “Post Name” option and save changes.
2. Edit Profile
As you set your WordPress site for the first time, it’s time to get some control of your website by properly adding your name and profile image.
3. Set Your Name and Profile Image
In the top right corner of the screen, you see “Howdy”. Here you’ll see a link to “Edit Profile”. Go to this setting, enter your first name, last name and choose the display name.
You can also set your profile picture using Gravatar. You can also set your password or change your email address from here. Once all is done, hit the “Update Profile” button at the bottom to save all changes.
4. Start With a Clean Slate
When you start a new blog, you want to start with a clean slate, right? Because there are some default posts, pages, and plugins that you don’t need. So delete them.
Go to the “Post” option on the dashboard, here you’ll see “Hello World!” This is a default post, just delete it. Similarly, go to the “Page” option and delete any pre-existing pages.
Go to “Plugins”, first deactivate and delete all unnecessary plugins. Plugins are like software for your WordPress website to add more features and functions to your site. Of course, you can add new plugins later as you require them.
5. Site Title and Tagline
Go to settings> general settings
This is your blog’s identity, simply enter the name of your blog. The tagline gives a user an idea of what your site/blog is about. You should ideally add keywords of niche you are in. In my case, my site is about personal finance and make money. Here is my tagline: Money Momma Blog – Make Money | Save Money | Budget | Debt
Next is to make sure your WordPress address (URL) has “https” if it is “http”, just add an extra “s” after “http” and save changes. HTTPS is Hypertext Transfer Protocol Secure, which means is the user data transferred between browser and website is secured.
Also do same for Site address (URL)
You can also set your site language and time zone, date and time format from here.
6. Adding a WordPress Theme
The next step in setting up your blog is to install a WordPress theme. When you’re starting a new blog, you need a lightweight, fast theme which is easily customizable.
Because when it comes to a website, speed is the most critical factor. When someone visits your blog, he wants a website that loads fast, otherwise he will hit the back button and go elsewhere.
That’s why Kadence is my favorite theme. And the best part, It’s FREE.
In the dashboard, go to “Appearance” then “Themes”. Press the “Add New Theme” button. In the search bar, type “Kadence”. Once you find the theme, click “Install” and “Activate” it.
As it is activated, you can see a “Customize” button over it, press it, and it will take you to customization settings where you can change the theme color, font, header, footer, menu, widgets, and everything as you want.
Additionally, there are plenty of cool templates in Kadence you can choose for your site. Go to “Appearance” then click on “Kadence”, here you’ll see a button, “Install “Kadence Starter Templates”. Just install and activate it. Now you have a bunch of cool templates you can choose from.
I know this is too much to digest in one go. There is so much of information. I got it!
But don’t worry, you don’t need to master everything in one day.
So relax, don’t be overwhelmed by all this information. Take your time to figure out each part of setting up a blog. Once you start writing a blog post and publish, you’ll learn gradually.
Publishing your first blog post
TBH, I admit, starting was a bit of a challenge. I was in the same boat as you. Writing your first blog post is very difficult, especially when you’re a newbie, and have never written anything for an audience.
There is always fear and anxiety in your mind about how people will react to your writing. This is my first time, I want everything to be perfect.
And that’s the biggest problem. The quest for perfection is a never ending cycle. It kills your creativity. This is the single biggest reason why people fail in blogging.
You’ll always struggle to find that perfect topic, perfect timing, perfect voice for writing. But the answer is very simple, just start with an easier topic that you’re familiar with.
Let’s say you love gardening. Write your first blog post about gardening tips. Write naturally as you do. The important thing is to get the ball rolling.
Don’t worry, if it sounds childish. Your world will not end if your initial blog posts are not perfect. With practice, you will find your voice and everything will be fine.
Structure of a Blog Post
To assist you in crafting your blog posts, I’ll provide a basic framework that will serve as a guide each time you plan new content. This framework will help you determine where to begin, what information to include, and how to effectively conclude your content.
Divide your blog post into five simple parts:
Title: The main heading or title of your blog post. It should include your main keyword. Try to come up with a catchy title to grab the reader’s attention.
Introduction: Give a brief introduction about the main topic you’re writing about. Four to five short paragraphs are enough to write an introduction.
Pro tip: Avoid writing a single big paragraph like a wall of words because readers first scan your blog post to find the exact information they want. It’s hard to scan a wall of words and they will leave. Try to write short bite-sized paragraphs that are easy to read. A one-or two-sentence-long paragraph is enough.
Sub-heading: Elaborate the topic with more supporting points using subheadings. It can be in the form of bullet points, lists, or images.
Call to action: After reading your blog post, you want your readers to do something. It can be to buy your suggested product, check your affiliate links, or check any of your offerings. That is CTA. Call to action can be included at the end or anywhere between the paragraph of your content.
Conclusion: Summarize the main idea of your blog topic in a short paragraph in the end.
Images: Wherever it’s necessary, try to add relevant images to your content.
Types of blog posts: Whatever topic you want to write, you can use any of the styles mentioned below:
1. Listicles – Many popular sites use this technique. These are the lists of things that you are recommending to your audience. Listicles are very helpful for readers as it gives them plenty of ideas, and they are very easy to navigate. Like: “6 best makeup tips”, “9 ways to save money” are a few examples.
2. How-to posts – How to posts are an interesting way of writing a blog post, where you elaborate on a certain way of doing things in a systematic manner. For instance, “How to make a budget”.
3. Tutorials – In a tutorial type of blog post, you’ll explain to your reader’s the step-by-step process of making something. This is simply teaching someone with instructions via text. An example is a chocolate cake recipe, or making a fall centerpiece.
4. Review – This is mostly about reviewing a product, where you share your experience of using the product, it’s features and downsides. And give your final thoughts on it. An example is a baby shampoo review.
5. Answering a question or a bunch of FAQ – Many individuals encounter problems, they were often turning to Google to find the answers. You can write a blog post answering the question in the best way.
6. Your experience or personal story – If you want to share your own personal story or experience on a topic, that can also be a great way of writing an engaging blog post.
Promote Your Blog on Social Media
The next phase of blogging is getting some eyeballs on your content. Though Google is the most preferred source of traffic, but being a new site it will take some time till then you have to rely on social media.
To promote your blog, you have to make an effective marketing strategy that focuses on getting traffic from:
Pinterest: Pinterest has been my number 1 source of traffic for my site. What makes it unique is its large pool of audience who are interested in various topics.
First, you need to optimize your Pinterest profile and create relevant boards before sharing pins. Promote your blog post on Pinterest by sharing beautiful pins that links back to your blog post. You can also share video pins to get traffic.
Facebook: Create a Facebook page and a group for your blog. Regularly create engaging content that direct them to your blog post.
YouTube: Create a YouTube video relevant to your blog’s theme, and include a link to your website in the video description to attract additional visitors to your site.
X (Twitter): Network with fellow bloggers on X (Twitter), share their content, and they will reciprocate your articles.
Newsletters: Another great source of traffic are newsletters, where you create an email opt-in form and collect subscribers through your blog posts. Whenever a new subscriber signs up, you can send them a newsletter linking to your latest blog post via email. In this way, you can turn your subscribers into traffic.
Monetizing Your Blog – Make Money blogging
Let’s talk about the juiciest part: MAKE MONEY BLOGGING!
Of course, we all want to make some money while blogging. But as I said before, money is just the byproduct of the value you provide to your audience.
As you help your audience and solve their problems with your blog post, money will automatically follow.
Although there are many ways to make money online from your blog, the most common ways are:
Advertising Networks – Running display ads is one of the easiest ways to monetize your blog. There can be image ads, video ads placed on various sections of your site, when someone clicks on those ads and you make money.
The catch here is that you must have good traffic numbers on your website to earn a decent revenue through ads. Google AdSense and Mediavine are a few examples of ad networks.
Affiliate Marketing – As a content creator, when you write about a topic, you sometimes recommend a product or service through links within the blog posts. When someone from your audience clicks on those links and makes a purchase, you get a commission on that deal. This is called affiliate marketing.
Before promoting a product, you first have to sign up with an affiliate network. Amazon affiliate is the best example where you can promote any of their products through links.
Brand promotion – When you have a good following on your blog, brands start to approach you to promote their product within your content. And you get paid for the sponsored post.
You must have seen on some food blogs where a baking recipe has been created using a sponsored ingredient.
Selling own products – If you already own a physical or digital product, your blog can provide a greater opportunity to market these products to your audience. This will further boost your sales.
Through your blog, you can sell handmade items like gifts and crafts. If you’re good at graphic design, you can sell printables, banners, icons, invitation cards and Cricut SVG files.
You can offer digital products like: e-books, crochet patterns, coloring sheets for kids, budget templates, planners, meal plans and workbooks.
Online courses – The best part of blogging is that if you’re good at any skill, it can be yoga, photography, or coding. You can share this knowledge with the audience by creating online courses.
Membership sites – Another great way to monetize your blog is through the subscription model, where you offer exclusive content that is only available to paid members (via login access). It can be related to art and painting, fitness yoga, education materials, or musical lessons, 1-on-1 coaching.
Final Words
I hope this step-by-step guide has paved a smoother path for you to kick-start your blogging journey. To quickly summarize what we’ve learned, what truly hinders you from starting a blog isn’t the technical obstacles, but rather the self-doubt and pursuit of perfection.
Let go of all your negative thoughts and take the first step without worrying. Find your niche based on the areas of your interest, and start sharing that knowledge, choose your blog name wisely, get hosting and set up your WordPress blog.
Publish your first blog post and master social media by promoting your content on various platforms. Finally, make money online via your blog with ads, affiliate marketing, selling your own products and courses.
If you still have any queries or doubts about blogging, feel free to reach out to me.